Contents

Kubeflow on Windows


After following the Kubeflow project for a while, I decided to try it out. Even though I am an OSX/Mac user, I recently bought a new ThinkPad that came with Windows installed and took this chance to explore what is new in Windows and the Windows Linux Subsystem (WSL).

To test the limits of WSL, why not try to make Kubeflow run on it? That way, I can check if some must-have features like containers, Kubernetes, port-forwarding, etc… are fully available, and how easy is it to make them work.

1. Run Kubernetes on Windows

Before installing Kubeflow, we need a local Kubernetes cluster. Follow the steps on the Run Kubernetes on Windows to have a working local Kubernetes cluster.

2. Installing Kubeflow

Kubeflow’s documentation is very good, but as of today - July 2020 - their official documentation doesn’t provide a way to run it on Kubernetes using the new WLS2. To be fair, it is an edge use case and maybe not very useful for most people. I’m just having fun :person_shrugging:.

I followed the “Instructions for installing Kubeflow on your existing Kubernetes cluster using kfctl_k8s_istio config”. According to the documentation it should be exacly what we need.

creates a vanilla deployment of Kubeflow with all its core components without any external dependencies

All the links I’m providing here are for version 1.1.0 of Kubeflow. This way of installing Kubeflow could be deprecated in the future, but if it isn’t, it should work for any other version.

Kubeflow provides a binary called kfctl that makes it easier to install all the necessary components. Here are the commands I followed to install kfctl:

1
2
3
4
5
curl -LO https://github.com/kubeflow/kfctl/releases/download/v1.1.0/kfctl_v1.1.0-0-g9a3621e_linux.tar.gz \
&& tar -xvf kfctl_v1.1.0-0-g9a3621e_linux.tar.gz \
&& chmod +x kfctl \
&& sudo mv ./kfctl /usr/local/bin/kfctl \
&& rm kfctl*.tar.gz

With kfctl installed and a local Kubernetes cluster running, we can now install Kubeflow.

Here are the commands I used to install Kubeflow. I am calling my project testing-kubeflow and placing all the files under ${HOME}/Projects/kubeflow-test/.

1
2
3
4
5
6
7
8
export KF_NAME=testing-kubeflow
export BASE_DIR="${HOME}/Projects/kubeflow-test/"
export KF_DIR=${BASE_DIR}/${KF_NAME}
export CONFIG_URI="https://raw.githubusercontent.com/kubeflow/manifests/v1.1-branch/kfdef/kfctl_k8s_istio.v1.1.0.yaml"

mkdir -p ${KF_DIR}
cd ${KF_DIR}
kfctl apply -V -f ${CONFIG_URI}

These are the pods that result of the installation:

 1
 2
 3
 4
 5
 6
 7
 8
 9
10
11
12
13
14
15
16
17
18
19
20
21
22
23
24
25
26
27
28
29
30
31
32
33
34
35
36
$ kubectl get pods -n kubeflow
NAME                                                           READY   STATUS      RESTARTS   AGE
admission-webhook-bootstrap-stateful-set-0                     1/1     Running     0          2m
admission-webhook-deployment-569558c8b6-x9q7g                  1/1     Running     0          2m
application-controller-stateful-set-0                          1/1     Running     1          5m
argo-ui-7ffb9b6577-zrfgl                                       1/1     Running     0          2m
centraldashboard-659bd78c-hpdth                                1/1     Running     0          2m
jupyter-web-app-deployment-679d5f5dc4-xxmb4                    1/1     Running     0          2m
katib-controller-7f58569f7d-h445m                              1/1     Running     0          2m
katib-db-manager-54b66f9f9d-r6pzl                              1/1     Running     0          2m
katib-mysql-dcf7dcbd5-gn6w2                                    1/1     Running     0          2m
katib-ui-6f97756598-9dqgf                                      1/1     Running     0          2m
kfserving-controller-manager-0                                 2/2     Running     0          2m
metacontroller-0                                               1/1     Running     0          2m
metadata-db-65fb5b695d-gk8k4                                   1/1     Running     0          2m
metadata-deployment-65ccddfd4c-vxljl                           1/1     Running     0          2m
metadata-envoy-deployment-7754f56bff-x6dkk                     1/1     Running     0          2m
metadata-grpc-deployment-75f9888cbf-mzvhc                      1/1     Running     1          2m
metadata-ui-7c85545947-b8c49                                   1/1     Running     0          2m
minio-69b4676bb7-9gqnp                                         1/1     Running     0          2m
ml-pipeline-5cddb75848-b9r4v                                   1/1     Running     0          2m
ml-pipeline-ml-pipeline-visualizationserver-7f6fcb68c8-l6msp   1/1     Running     0          2m
ml-pipeline-persistenceagent-6ff9fb86dc-shtjd                  1/1     Running     0          2m
ml-pipeline-scheduledworkflow-7f84b54646-8t7gx                 1/1     Running     0          2m
ml-pipeline-ui-6758f58868-gcxqq                                1/1     Running     0          2m
ml-pipeline-viewer-controller-deployment-745dbb444d-x87vb      1/1     Running     0          2m
mysql-6bcbfbb6b8-cr8kw                                         1/1     Running     0          2m
notebook-controller-deployment-5c55f5845b-xfbfb                1/1     Running     0          2m
profiles-deployment-c775584c7-58fq8                            2/2     Running     0          2m
pytorch-operator-cf8c5c497-6mr4q                               1/1     Running     0          2m
seldon-controller-manager-6b4b969447-sz92b                     1/1     Running     0          2m
spark-operatorcrd-cleanup-8xf99                                0/2     Completed   0          2m
spark-operatorsparkoperator-76dd5f5688-n9zdk                   1/1     Running     0          2m
tensorboard-5f685f9d79-bqqpp                                   1/1     Running     0          2m
tf-job-operator-5fb85c5fb7-7gt6s                               1/1     Running     0          2m
workflow-controller-689d6c8846-d29sj                           1/1     Running     0          2m

After Kubeflow is installed, we can get the port for the Kubeflow API and open it in the browser:

1
2
3
$ echo "http://localhost:$(kubectl -n istio-system get service istio-ingressgateway -o jsonpath='{.spec.ports[?(@.name=="http2")].nodePort}')"

http://localhost:31380

3. Setup Kubeflow

The initial wizard from Kubeflow asks us to create a namespace in the Kubernetes clusters. Kubeflow uses the native Kubernetes namespaces to provide Multi-user Isolation. Since we are experimenting, using an anonymous user is enough, and we can accept the anonymous namespace. Any pods created by Kubeflow run under this namespace.

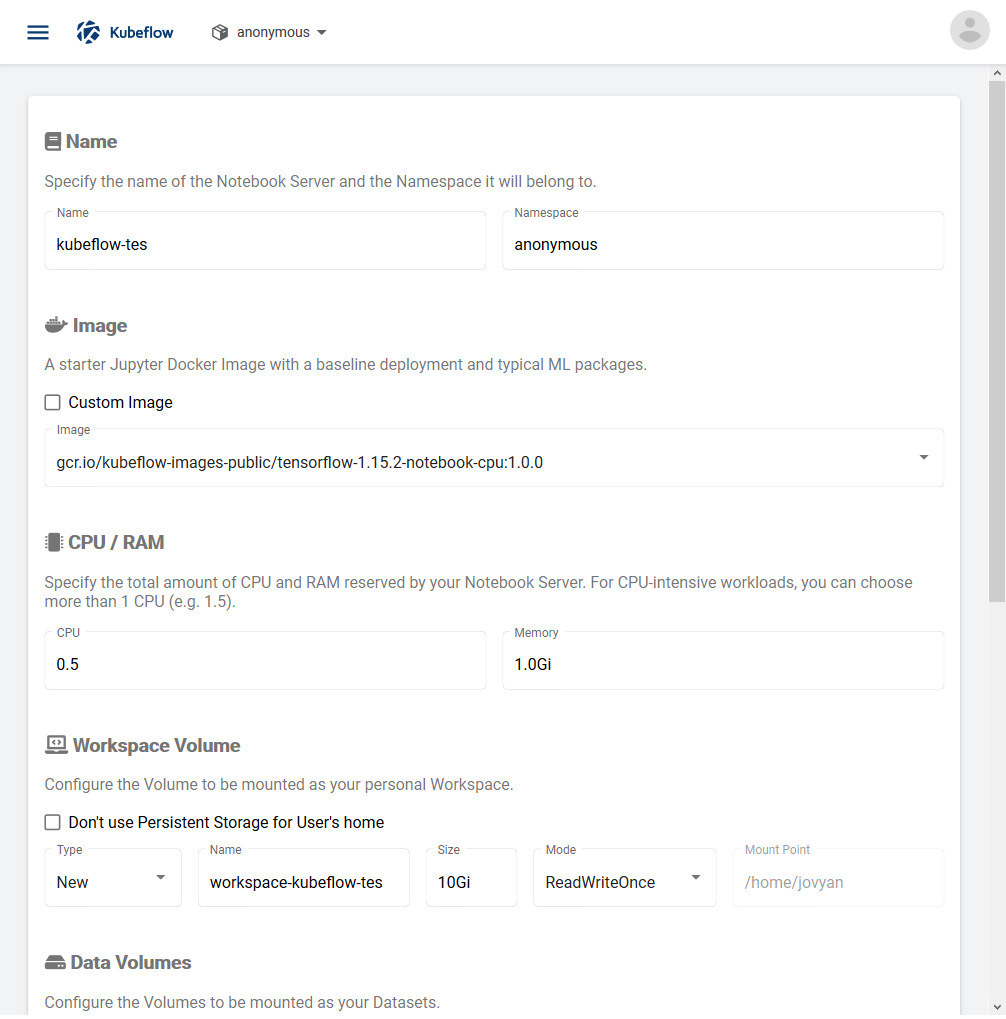
Lunch a Jupyter notebook server

Now that We have Kubeflow installed, we can create a Jupyter notebook server and try to access its UI to do a simple task.

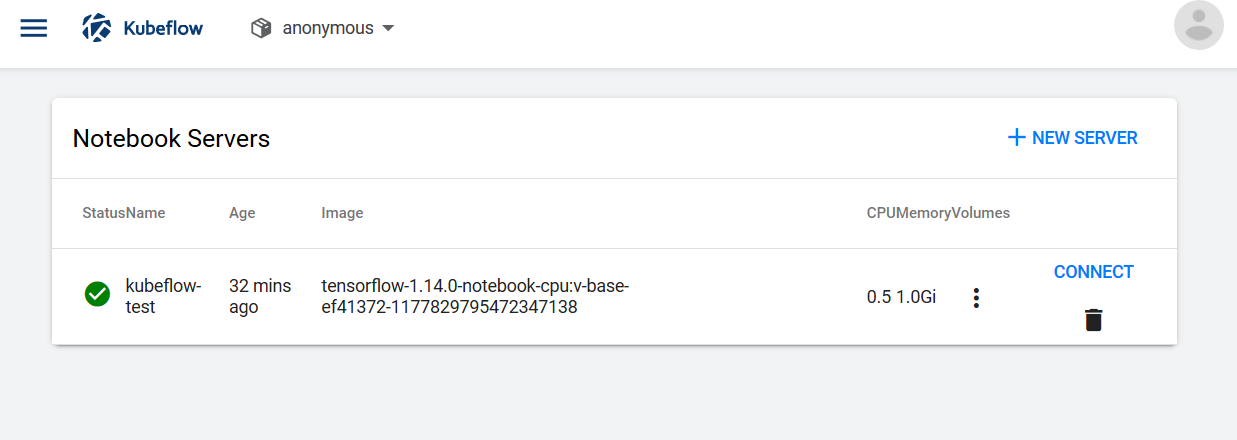
We click on the Notebook Servers menu in the sidebar and + New Server to lunch a new Jupyter server.

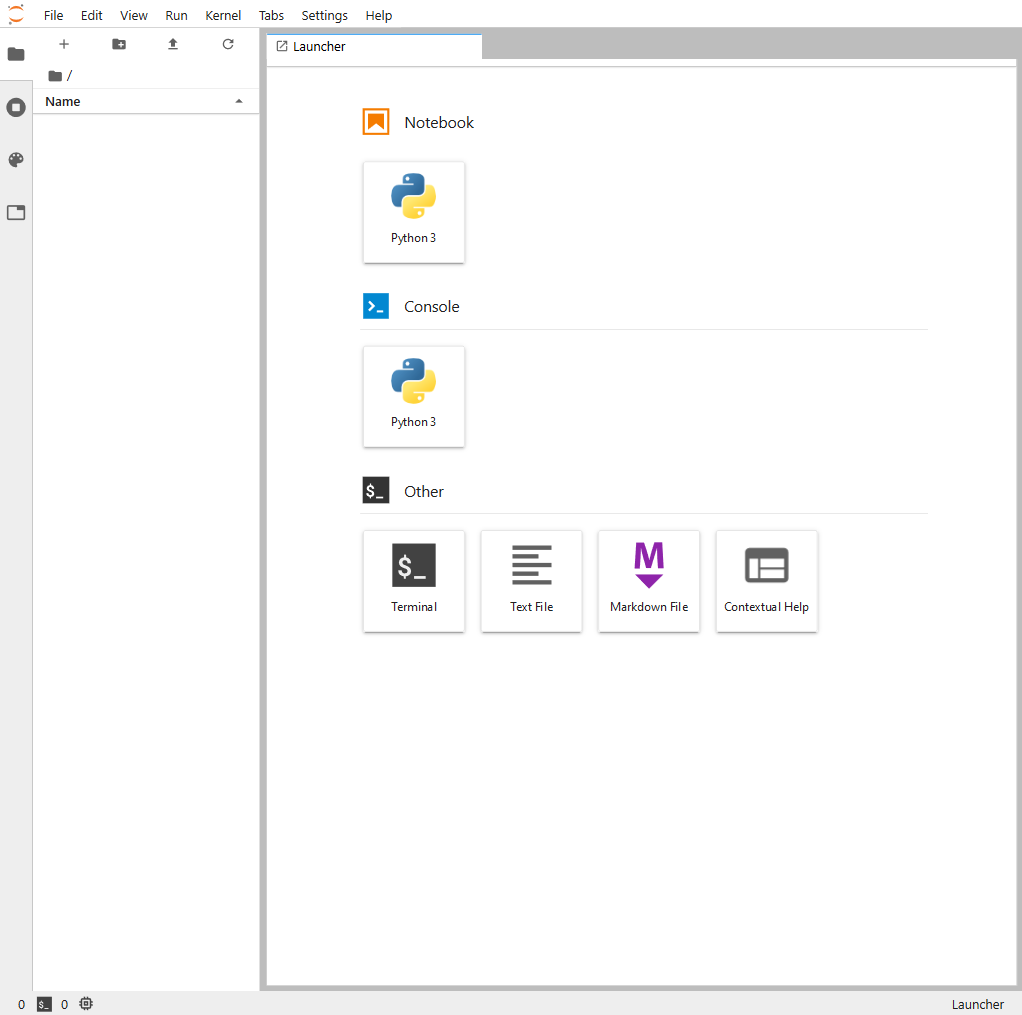
After the notebook is created, click CONNECT to open a notebook.

connect kubeflow jupyter notebook

We can also replace the URL http://localhost:xxx/tree with http://localhost:xxx/lab to use Jupyter Lab.

kubeflow jupyter notebook

And check which pods are running in our namespace:

1
2
3
$ kubectl get pods -n anonymous
NAME              READY   STATUS    RESTARTS   AGE
kubeflow-test-0   2/2     Running   0          3h54m

Final thoughts

I am impressed with how easy it is to run a simple development Kubernetes cluster on Windows nowadays.

As for Kubeflow, I did not explore it any further. I searched for some examples in their repository, but all the examples were focused on Google Cloud Services centric or not working at all.

Note that I was experimenting on a Laptop with 16GB of Memory when the minimum requirement for Kubeflow is 12GB (not on Windows). Although it works, I wouldn’t say it is productive at all and, in the future, I want to test Kubeflow in a beefier machine from some cloud provider.